
5 Steps to Use Dubsado to Launch a New Business or Service
So, you’re either about to launch your business or add a new service, but you want to know if the logistics of that are possible using just Dubsado? We’re here to tell you that the answer is yes!
Dubsado is a CRM that has many robust features that can be turned into whatever you need them to be to help you launch, meaning you don’t even need a website nor sales page to make it happen. For example, lead capture forms can be turned into waitlists, proposals can act as a landing page, workflows can allow you to send automated emails, and more.
We know you’re wondering But how?, so that’s what we’re going to dive into today!

First Thing’s First: Plan Your Launch
The key to any of this deeming successful is to plan your launch from beginning to end. Brainstorm and get clear on what you’re going to offer. Asking yourself specific questions about your offer will allow you to know exactly what language to use in your marketing strategy, like who needs your offer, how it will improve their life or business, why you’re the right person to offer it, etc.
Then, outline important dates. When are you going to launch it? What are your cart open dates? When will you start posting pre-launch content? These things should be mapped out as well. We go over these steps deeper in this blog post, so definitely check it out.
You’ll also need to map out what materials you’ll need for this launch, like social media graphics and– the fun part– your pages in Dubsado.
How to Use Forms for Your Launch
If you’re newer to Dubsado, they offer a variety of forms for you to use: proposals, contracts, lead capture forms, questionnaires, and sub-agreements. These can be turned into virtually whatever use you have for them since they’re so customizable.
LEAD CAPTURE FORM TURNED WAITLIST FORM
If you wanted to make it known that something new is coming (whether that’s a new service or the doors opening to your business), but want to gain some interest first so that you have a warm list to sell to, we’d highly recommend creating a waitlist form using Dubsado’s lead capture forms.
It’s a super simple switch to take the form to the next level! Where you’d usually have language of thanking them for their interest in reaching out to you, for example, thank them for their interest in the particular service(s) you’re going to be offering. You can gather whatever info you need from them aside from the usual name and email address. If you’re offering a new service with different pricing options, you could ask which package they’re interested in, and a space for comments if you’d like, as shown below using our Waitlist Form Template in The Creative Template Shop.

Another tip is to include a checkbox asking if they consent to receive marketing emails from you, so that if you’re using an email marketing service for your launch emails, you’ll have the proper legal consent from them to be added to your list!
HOW TO TURN A PROPOSAL INTO A LANDING PAGE
One of our favorite things about Dubsado’s proposals is that they can be shared publicly either via a link that they provide, or it can be embedded on a page of your website if you have one. What this means for you is that you can turn a proposal into a public sales page of sorts to showcase your business and services, gather information from clients, have them sign the contract, and pay all in one step!
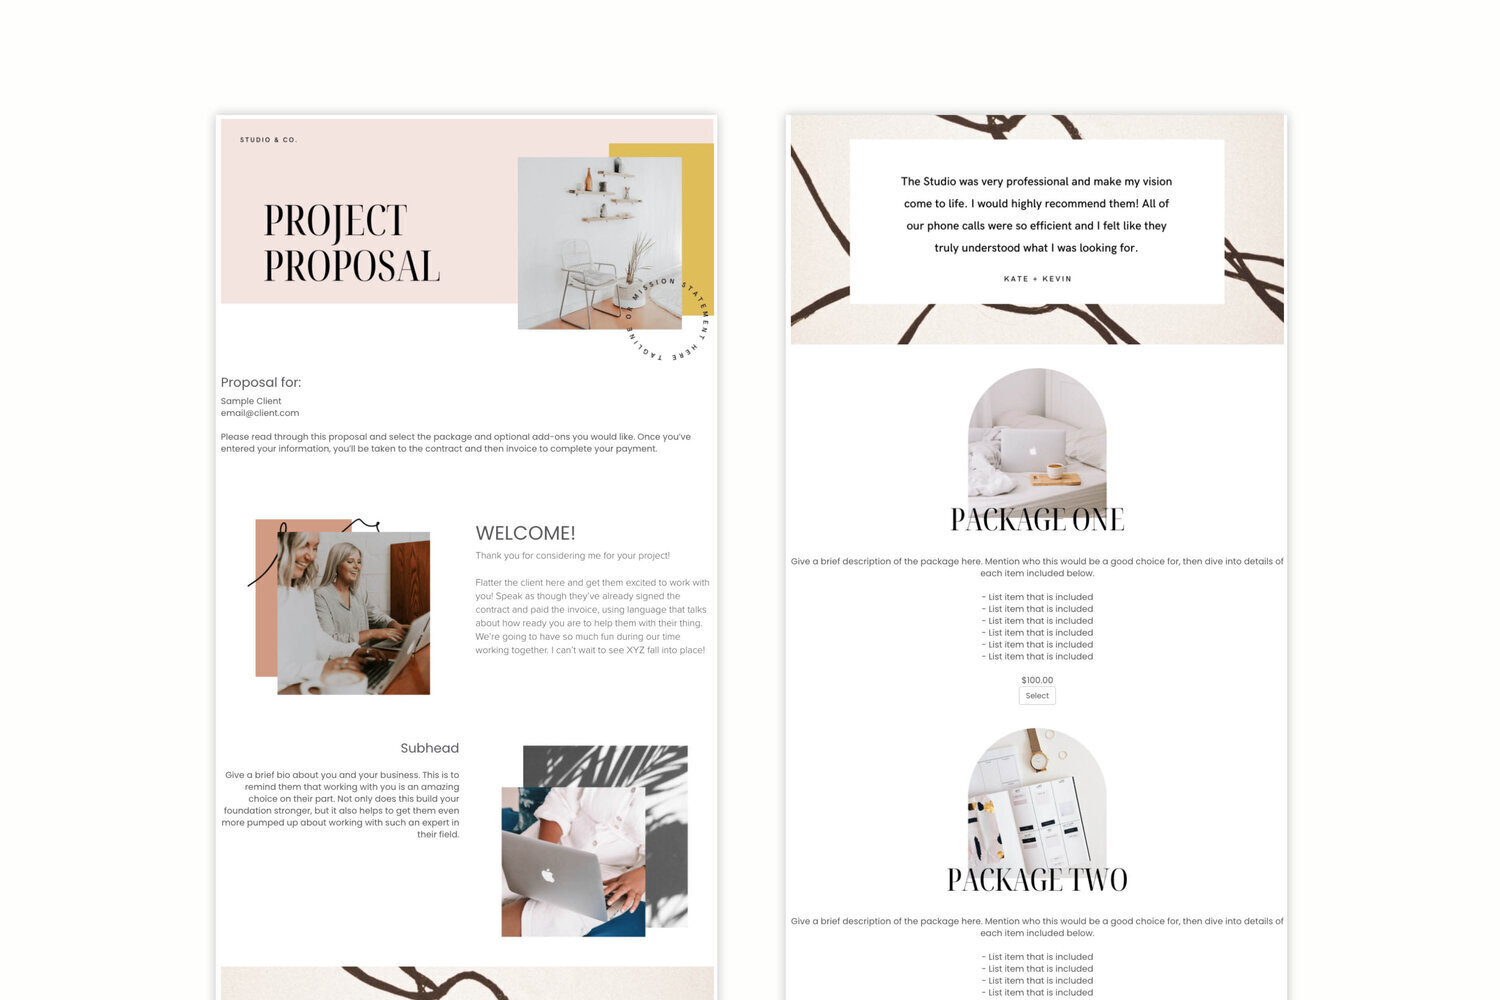
Let’s break down the anatomy of a successful public proposal. The important thing to remember is that you’re basically treating this as if it’s the first time anyone has heard about you (it may very well be!), so be sure to provide some background about yourself and your business. Sprinkle in a couple of testimonials between sections to reinforce the point that you’re an expert in your field and you know what you’re doing.
Dubsado’s drag-and-drop tool allows you to easily add all of your sections, including packages. These are set up on the backend of your settings so that you can choose which packages to display with the price, though the description can be edited within the proposal. If you need pricing help or want to learn the psychology behind packages, check out this blog post. If you want, you can even provide optional add-on packages for clients to choose from, just make sure that in the proposal settings, you allow multiple packages to be chosen.
You should also provide the next steps that the client needs to take to complete the process and work with you. For example, if you have a contract in place behind these services, let them know that it will be coming up next after the proposal, and then the invoice (unless you prefer to send them separately after the fact, which can be arranged via the proposal settings).
Include spaces for the client’s contact information and any other info you may need to gather for your process, like what timezone they’re in, questions or comments they have, etc. Also provide a list of FAQs they can read to reduce the chances of you receiving repeat questions.
Here’s an example of how this could all come together using our newest Dubsado Proposal Template in The Shop.
GET FEEDBACK FROM CLIENTS USING A QUESTIONNAIRE FORM
When the launch is all said and done, you’ve gained some new clients under your belt, and you’ve been working together for a while, it’s time to send a feedback form so that you can gather new testimonials!
With feedback forms, they’re completely customizable to what you want them to say or look like as with every other form. You could include a video of you at the top thanking them for working with you after a project is completed and offer to feature them on your website, you could have a standard form that you send at the end of each year to get feedback all at once, how ever you decide to send them is up to you and your preference.
As long as you’re regularly getting feedback, it doesn’t matter how you do it. New testimonials are the most crucial part of selling because people want to know the experience others had while working with you. Think of it like this: You don’t purchase a new product off of Amazon without reading the reviews first, right?
How to Automate Parts of Your Launch Using Workflows in Dubsado
Dubsado’s workflows feature allows you to create multiple workflows for different processes of your business. Let’s go back to your waitlist form, for example. You could have a workflow that triggers once someone has completed it thanking them again for their interest in your new service(s) and providing extra resources that will help them until it’s time to launch.
With your public proposal/landing page, this depends on how you have it initially set up. You may notice we mentioned that although Dubsado allows you to have a smooth 3-step process that will take them from proposal to contract to invoice seamlessly, you could send these separately on the backend.
In this way, your public proposal would serve more as a landing page or more robust lead capture form of sorts that will tell you who is interested in what package specifically right off the bat, and then the conversation can be carried over to their inbox versus allowing them to purchase immediately.
How this would work in a workflow is that your first step would be to create a to-do to review the proposal. Then, you would send an inquiry email to book a call (or whatever your process for onboarding looks like). Their contract and invoice could also be sent separately in the workflow. One of the best things about Dubsado’s workflows is that you can mark steps for approval first, meaning you’ll have the opportunity to edit an email before it sends off.
Basically, take your usual onboarding process and think of ways that it could be automated. The chances that it’s possible with a workflow are high. Dubsado’s workflows have multiple actions, like:
Change a project status
Add a tag
Send email
Send form
Create todo
Send contract
Send primary invoice
Create invoice
Active/deactive client portal
Send appointment scheduler
Archive a project, and more!
Write down your processes now and brainstorm how it can be automated using their workflows feature. If you get stuck, a Dubsado rep is available to help you with your set up, so you never have to worry about doing anything alone!
The Backend Techy Stuff
Aside from just forms to build, you’ll need to make sure the other functions of Dubsado are set up and running as well, like:
Connecting your payment processor (Stripe or PayPal) so that you can get paid when you send invoices
Connecting your email account so that you can send and receive emails through Dubsado
Creating your scheduler so that you can book appointments
Customizing and creating canned emails that you’ll need to match your brand voice
Creating your packages
Setting up payment schedules, if applicable
Creating custom project statuses and tags to make organizing your clients even easier
Although it may seem like a lot, none of these steps should take longer than a few minutes, and like we said before, even if you do get stuck, you can always reach out to get help from the experts.
Launch!
Now that you have everything set up, it’s time to finally launch! Don’t stress about this being perfect on the first go. Launching is all about trial and error because the likelihood is that you’ll re-launch quite a few times until you finally find a flow that works best for you!
Are you excited to finally launch with Dubsado? If this is your first time hearing about the software and you want to try it out, you can learn more about what Dubsado can do for your business and how to save 30% off your first month or year right here.
