Why are My Canva Images so Blurry and What Can I do About It?
There’s no worse feeling than pouring your heart and soul into a graphic you’ve made in Canva that you’re so proud of, only to see that it ends up blurry and overall just crappy quality when you upload it to your website or social media channels.
You try again to no avail. Still blurry. Still suck-y.
So, why are your Canva images blurry, and what can you do to fix it?
We’re here to walk you through how to make sure your creations look clean and crisp every time (and don’t worry, we tried to limit the language to normal-person speak).
Let’s Talk About Canva, Baby!
It doesn’t matter what kind of background in graphic design you have or how proficient you are in all of the professional design tools, Canva is still one of the top go-to design tools for so many people. Even with 2 professional designers, 20+ years of background in marketing, and 25+ years of design experience, our team uses Canva everyday.
Don’t Take It Out on Canva.
Look, we know how frustrating it can be when you’ve spent hours on creating one graphic, but it doesn’t turn out how you imagined it would. Canva isn’t entirely to blame, though. There are a few other factors that come into play here to make sure that when you upload your image to your website or social media pages, it looks exactly how it did when you made it.
LET’S START WITH DIMENSIONS
A huge part of your issue could come from using the wrong dimensions for your image, causing it to become too stretched or, if the dimensions are too small, blurry. Canva already has a ton of size options built-in to fit almost any kind of graphic you want to make, ranging from an Instagram post to YouTube Thumbnails and even a recipe card. If you type in the kind of graphic you’re wanting to make, chances are an option for it will pop up.
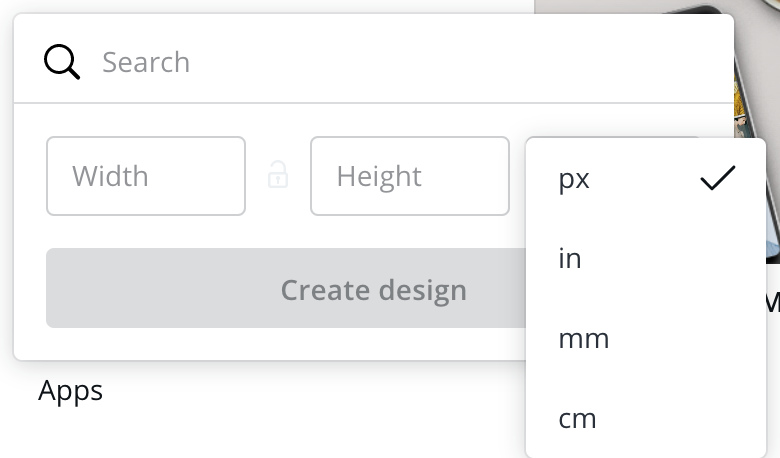
If it doesn’t, though, 9 times out of 10, doing a quick Google search will tell you what size an image should be for which purpose. Once you find it, just click the “Custom Dimensions” button when going to start a new design and input the size you need.

From there, you can manually input the dimensions you need in either pixels, inches, centimeters, or millimeters.
If you find you’re having to perform a trial-and-error run and resizing your image to see what works best, be sure to maintain the same aspect ratio. (In normal words, that means if you reduce the width by half– or 20%, 35%, etc– reduce the height by half, too.)
Resizing can be done easily within a design itself if you’re a Canva Pro member.

We’ve done the dirty work for you and found a few image sizing tips for things you won’t find preloaded in Canva.
If you have a Squarespace website, the recommended width for images is no wider than 1500px to 2500px wide.

For a Wordpress website, some recommended image sizes are 1200 x 630px for blog posts, 2880 x 1500px for fullscreen images, 900 x 1200px for landscape feature images, and vice versa for portrait images.

For Pinterest, your profile photo should be a minimum of 165px width and height, profile covers should be a 16:9 aspect ratio such as 1920 x 1080px, and the recommended size for board covers is 600 x 600px.

Facebook cover photos for business pages should be 820 x 312px for the best quality, and group cover photos are 1640 x 856px. Profile photos on Facebook should be a minimum of 180px width and height.

WHAT IF YOU STILL HAVE NO IDEA WHAT DIMENSIONS SOMETHING SHOULD BE?
Sometimes Google just may not do you justice. What you can do in this instance is download Page Ruler. It’s an extension for Google Chrome that will give you the pixel dimensions as well positioning and measure elements to anything on a webpage. Talk about a life saver!

SOME SITES COMPRESS IMAGES
Many social media websites, Facebook being a huge perpetrator, compress images to help their site load faster. You’ve probably noticed that after you upload a beautiful, crisp graphic or photo on Facebook, it ends up looking a tad (or very much) blurry. Because of it being a Facebook thing, there’s only so much you can do in Canva, but some tips you can try to help it look as great as possible are:
Download as a PNG file type, especially if there is text on your image.
Compress your image without losing quality by using a free website like Tiny PNG.
Double the dimensions of your design in Canva.
Never create a design with smaller dimensions than what is recommended by that platform. For example, Instagram’s square image size is 1080 x 1080px. Creating and uploading an image that is 800 x 800px will cause it to look stretched and blurred.
STICK TO HIGH RESOLUTION IMAGES
Any photos you’re using in your design should be high resolution. Stick to professionally photographed images, whether they are your own branded images or stock photography. To keep things consistent, try using stock photos from the same photographer. If you’re in need of professional stock images to use in your business, The Shop offers a set of 30 stock photos in three different color palettes.
Another tip to be aware of is to make sure you aren’t stretching or enlarging your photos any more than they already are. This will almost always make them appear blurry if they’re stretched beyond their resolution size.
CONVERT FROM A PDF TO JPG
This is an extra step you can take when downloading your Canva images if you’ve found they still come out blurry. There are online file converters, like SmallPDF and PDF2JPG, that will allow you to turn a PDF into a JPG image. Many have found this to be a foolproof way to have the most crisp image.
Download your image as a PDF Print.
Upload it into your PDF to JPG converter.
Convert to a JPG image.
Those three steps could make a huge difference in the turnout of your Canva image. Here’s an example of a regular PNG image (left) and the same image downloaded as a PDF and converted to a JPG (right).

You can already tell how substantial the difference is by looking at them, but just wait until you zoom in. (Yikes!)
THE BASICS OF GRAPHIC DESIGN
In today’s world, you don’t need to have taken a class or course to design images for your business. Canva makes it incredibly easy to put together a graphic quickly. With that said, there are some basics that, if you follow them, will help your image look more professional.
This one may seem obvious, but is overlooked too many times. Be sure your image contrasts well. Use dark text on light backgrounds and vice versa.
Only use 2-3 of your branding colors in one design.
Sans-serif or serif fonts are your friend. Scripts can often be hard to read, especially if they’re added over an image, so use them sparingly.
Less is more. Try to keep your image from being too busy. Choose a couple elements to be your main focus, make sure they stand out, and any additional elements shouldn’t overpower those main pieces.
Designing Made Easy
All of this graphic design stuff can be hard for someone who has little to no design experience. The “rules” to follow can be frustrating if this isn’t something you do all the time (or at all!). Come, my friend, and let us introduce you to the one-stop-shop for all of your design and marketing needs, The Creative Template Shop, lovingly known as just The Shop.
We offer graphic templates in three color options– bright, neutral, and soft– for virtually all of your marketing needs, and we add four new designs every second Tuesday of the month. A few of our graphic templates include opt-in workbooks, presentation templates, media kit templates, social media and Pinterest templates, and so much more. All you have to do is upload them into Canva, add your own photos and wording, and you’re done! You could also change the colors and fonts to your own branding if you wanted to. In a matter of minutes, you have a completed design ready to use in your creative business.
Our full collection of graphic templates carries a value of over $3500 (and growing each month!), but you can grab all of the templates for only $47 per month by becoming a member. There are some pretty snazzy benefits to being a member, if we do say so ourselves! You’ll have:
Unlimited downloads of all current templates and future new releases
The ability to request designs and send us your ideas for what you’d like to see in The Shop
Access to the items that are exclusive to only Shop members (like our beautiful stock photography)!
Included in your membership, you get 30 days to try Canva Pro for absolutely free.
Canva Pro unlocks so many extra benefits like saving with a transparent background, one-click image resize, access to over 60+ million elements, using their Brand Kit feature to upload your own fonts, logos, and save your branding colors, and so much more.
Now, Go Rock Those Clean, Crisp Canva Creations!
That’s it, babe! These are the go-to steps we’ve used to keep our images looking as high-quality as possible when uploading to our website or social media channels. Remember to use the correct dimensions (you’d rather it be too big than too small), download as the appropriate file type, use high res images, and avoid enlarging photos beyond their resolution size, and you’ll be surprised the difference it will make once you upload your Canva image to its place. If you still need troubleshooting help, you can check out these two sections on Canva’s Support site, “my design looks blurry” and “my print looks blurry”.