
The Ultimate List of Trello Hacks that will Make You Dangerously Productive in Your Small Business
We used to be a paper list hoarder. We had tabbed notebooks separated by topic. We had Post-it notes covering our desk at all times. We had meaningless scribbles and scraps of thoughts everywhere. And the funny thing was, we thought that this was the best way to be organized. We thought we had mastered it.
But lo and behold, there is a better way. And without hesitation, we can say it changed our entire business and our lives!

Trello For Business is Waiting For You
Every time Emylee and I learn something new that we find valuable, we turn around and teach it. When we mastered Trello (the ultimate organization tool) we knew we had to share. See, straight out of the box Trello looks like a retro 1980s video game — basic and boring. BUT, when we figured out how to customize it (i.e. making it Target-dollar-spot sexy), we decided to bundle up all our boards and give them to you!
OUR FAVORITE HACKS AND ZAPS
Inside our program, we teach you everything you need to know to get started right now (seriously, you could rework your whole business in the next 2 hours). But to make it that much cooler, today I thought I would share with you some of our favorite hacks and zaps.
CREATE RECURRING TASKS IN A SIMPLE ZAP
STEP 1: Account Setup
To get started you will need to create your free Zapier account if you don’t have one already.
STEP 2: Setup the Trigger
Once logged into Zapier, hit the large “Make a Zap” button at the top. You will then be taken to a screen that looks like this:

Search for and select “Schedule”.

You will then need to select the interval you want to be reminded of this task. We chose weekly. Once selected press “Continue”.

You will then be prompted to schedule the day and time of the reminder - keep in mind this isn’t necessarily the time you want to do it, just the time you want the task to appear on your board.

Press “Continue”, run the test, and press “Continue” once more.

STEP 3: Setup the Action
Select “Trello”.
On the “Select Trello Action” screen select “Create Card”. Press “Continue”.

At this time you will be prompted to log into your Trello account, test, and continue.
Select the board you would like the reminder on - I would suggest “My Week”.

Pick the list you want it to appear on - I suggest picking the day that corresponds to the day you picked in Step 2.

You are also required to select a Name - keep in mind this is what the title of the card will appear as on your board - it can literally be ANYTHING you want to be reminded of.

You will also have the option of adding a Description, Label, Card Position, and assigning it to a member of your team. You can add due dates, file attachments and, my favorite, a checklist with pre-loaded checklist items! Once you have finished filling in all the relevant information, press the blue “Continue” button.
Run the test and check that you like the results. Yes, the card just magically went to your Trello board so go check it out. Make any edits as necessary and press “Finish”.

Make sure your Zap is on and you are ready to go to productivity town!
Automatically Add Calendly Events to Your Trello Calendar
If you like to schedule meetings using Calendly then this hack will blow your mind!
STEP 1: Account Setup
To get started you will need to setup Calendly with your different event types and then create your free Zapier account if you don’t have one already.
STEP 2: Setup the Trigger
Once logged into Zapier, hit the large “Make a Zap” button at the top. You will then be taken to a screen that looks like this:
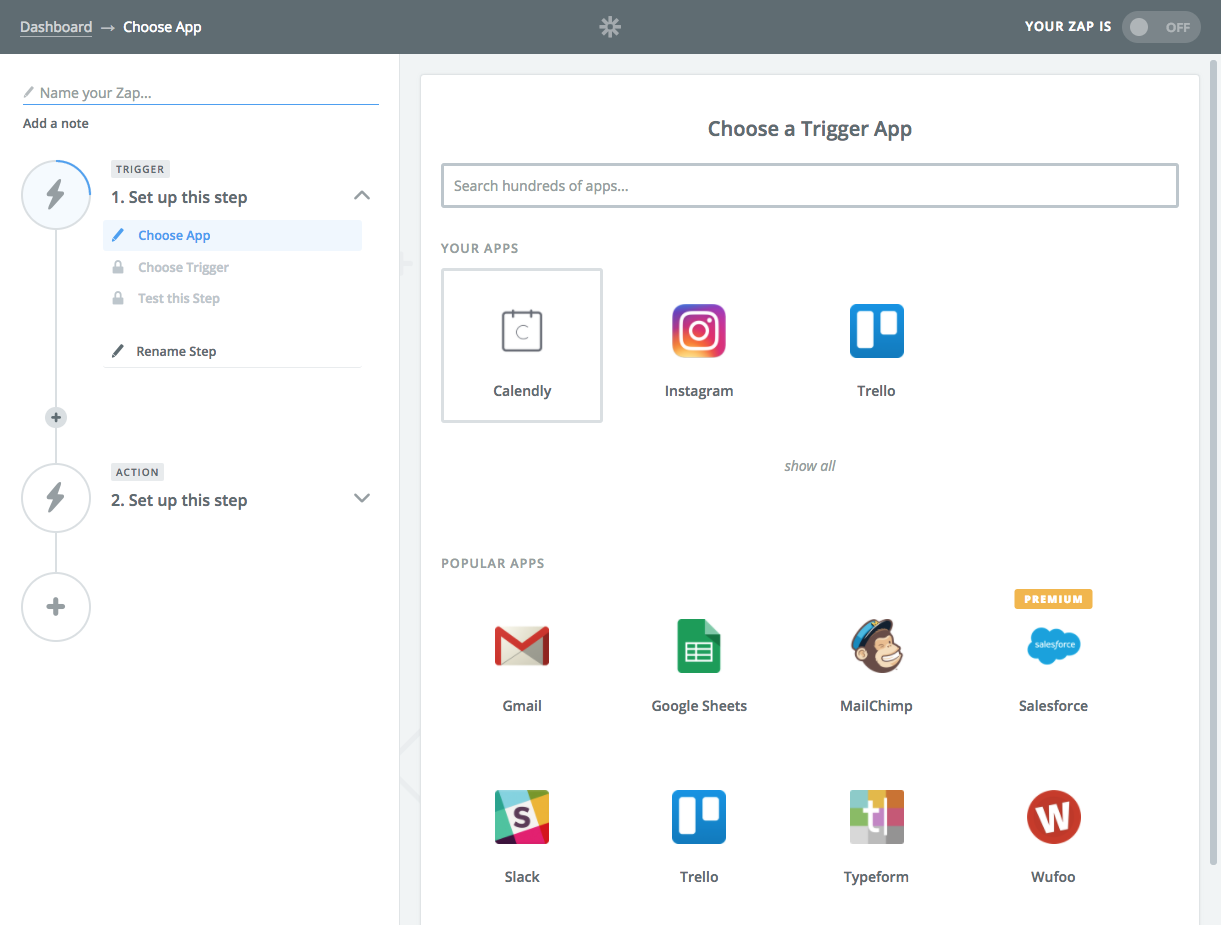
Select “Calendly”.
Select “Invitee Created”. And press “Save + Continue”.

Connect and test your Calendly account - at this time you will be prompted to log in. Once selected press “Save + Continue”.
On the next screen if Calendly is connected correctly you should only have to press “Connect & Continue”.
On the “Test Calendly” it will look like things are spinning, but in fact it’s waiting on you.

In a new tab visit your calendly account as if you were a visitor and schedule an appointment.
After you scheduled a “test” appointment you should get a confirmation screen that looks like this:
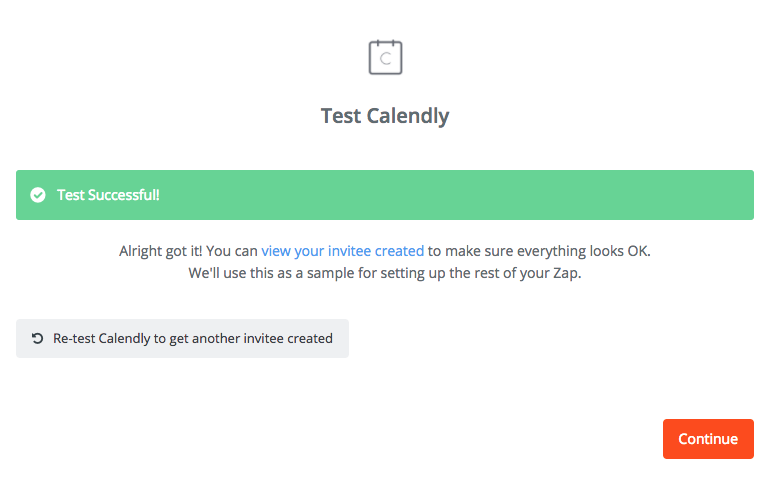
Press “Continue”.
STEP 3: Setup the Action
Select “Trello”.
On the “Select Trello Action” screen select “Create Card” and press “Continue”.

At this time you will be prompted to login to your Trello account, test, and continue.
Now we get to the super-fun part! What info do you want to transfer from Calendly to Trello?!
First select the board you want it to appear on:

I would suggest you pick “Big Picture Strategy” if you are utilizing the Trello For Business program.
Then pick the list you want the card to appear on:

In Trello we had made a new list called “Scheduled” to hold all our Calendly appointments.
The “Name” refers to what the card heading will be listed as in Trello. I choose to pick “Invitee Name” from the dropdown menu so I could at a glance see who the appointment is with. If you prefer the time, location or any information the invitee put in when they signed up for the appointment you can have multiple things listed on this line - just select from the + dropdown menu on the right side.

You can choose to leave the description blank if you like, but this is the information I thought would be relevant on the card.

You have the option to also choose a label, card position, and member assignment.
Now in order for this card to be in your Trello Calendar view, you cannot skip this step. Set the “Due Date” to “Event Start Time” in the + dropdown menu.

If this perhaps for a client meeting you can auto attach files and checklists (which is also freaking awesome). Once you are finished with all this information, hit the blue “Continue” button at the bottom of the screen.
At this point you will need to run a Test. If successful the fake meeting you setup in Step 2 will appear as a card on the list you picked in Step 3. At this point I would suggest reviewing it carefully to see if the formatting, and all relevant information you want is listed properly.
And BOOM! You’re almost done.
Press the red “Finish” button and make sure your zap is on.

Now next time someone schedules a meeting all the information you just setup will automatically transfer to your Trello board without you lifting a finger! Party Dance.
